Waffle Omelets: The Easy, Mess-Free Way to Enjoy a Western Breakfast
Are you tired of the breakfast dilemma? You crave a hearty, flavorful omelet, but the thought of meticulously flipping eggs in a hot pan, only for them to tear and fall apart, sends shivers down your culinary spine. Many home cooks share this frustration, often settling for scrambled eggs out of sheer convenience. But what if there was a better way? A way to enjoy all the rich flavors and satisfying textures of a classic Western omelet without the mess, the stress, or the dreaded flip? Enter the ingenious world of western omelet waffles.
This culinary innovation transforms your beloved waffle iron into the ultimate omelet maker. It's a game-changer for anyone who loves a protein-packed, flavor-filled breakfast but wants to keep things simple and streamlined. Forget greasy pans and delicate maneuvers; with waffle omelets, you just pour, close, and cook. Get ready to elevate your breakfast routine and discover a delicious, mess-free secret that will have you digging out that neglected waffle maker in no time!
Why Waffle Omelets Are Your New Breakfast Obsession
The concept of cooking eggs in a waffle iron might sound unconventional at first, but it quickly becomes a beloved breakfast hack once you experience its undeniable advantages. For many, the traditional omelet presents a formidable challenge. The perfect omelet requires a delicate hand, precise timing, and often, a bit of luck to achieve that beautiful, unbroken fold. This is precisely where waffle omelets shine.
First and foremost, the no-flip advantage is a revelation. The waffle iron does all the work for you, cooking both sides simultaneously and ensuring your egg mixture is perfectly contained. There's no need to worry about tearing, undercooking, or uneven distribution of ingredients. The result is a consistently cooked, golden-brown omelet waffle with those iconic pockets that are just begging to be filled with your favorite toppings.
Beyond the ease, western omelet waffles offer incredible versatility and nutritional benefits. They are inherently protein-packed, making them an excellent choice for a sustained energy boost. If you're mindful of your diet, these can be naturally gluten-free and easily adapted for low-carb lifestyles, especially when focusing on eggs, cheese, and vegetables. They're also a fun and novel way to present breakfast, particularly appealing to kids or anyone looking to break free from breakfast boredom. It’s truly a way to level up your weekend brunch or quick weekday meal.
Curious about more breakfast hacks that save you time and mess? You might find even more inspiration by checking out why you should Skip the Flip: Why Waffle Omelets are Your New Favorite Breakfast Hack.
Crafting the Perfect Western Omelet Waffles: A Step-by-Step Guide
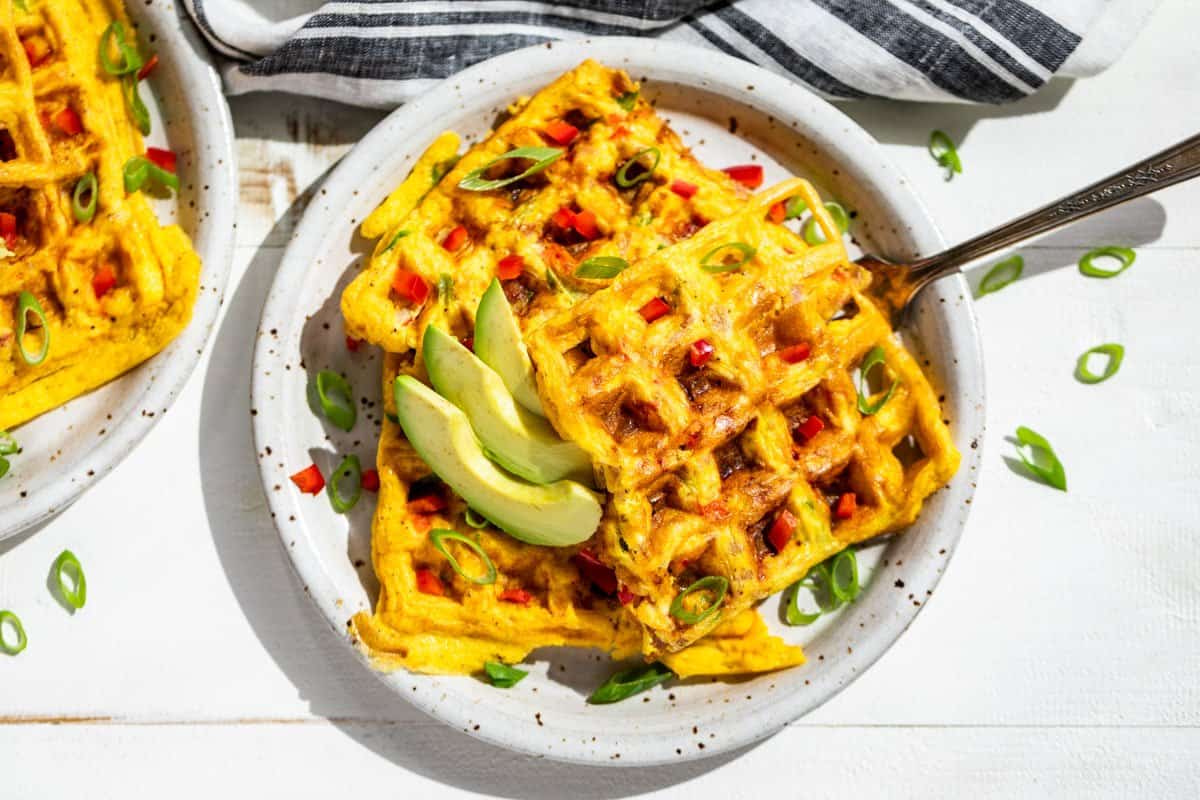
The "Western" omelet is a classic for a reason – its blend of savory ham, vibrant bell peppers, sharp onions, and creamy cheddar cheese creates an irresistible flavor profile. Translating this beloved combination into a waffle takes minimal effort and yields maximum satisfaction. Here’s how you can create your own batch of delicious western omelet waffles.
Essential Ingredients
To make four generous omelet waffles, you'll need a handful of fresh, quality ingredients:
- Eggs: 8 large eggs form the base of your omelets, providing a rich, custardy texture.
- Ham: 1 cup finely diced ham adds that essential savory, smoky flavor. Pre-cooked ham is perfect for convenience.
- Red Bell Pepper: ½ cup finely diced red Bellafina pepper (or any vibrant red bell pepper) provides a sweet crunch and beautiful color.
- Green Onions: 1 cup thinly sliced green onions for a fresh, mild onion bite, plus an extra ¼ cup for garnish.
- Cheddar Cheese: 1½ cups grated cheddar cheese delivers that classic gooey, tangy finish.
- Seasoning: ½ teaspoon sea salt (or to taste) and ¼ teaspoon freshly ground black pepper are crucial for enhancing all the flavors.
- Fat: Butter or avocado oil for greasing your waffle iron.
- Optional Topping: 1 ripe avocado, thinly sliced, for a creamy, refreshing counterpoint.
Prep Tip: The key to success is having all your ingredients prepped and ready to go. Dice your ham and bell pepper finely to ensure even distribution and quick cooking within the waffle iron. Slice your green onions thinly for best results.
Equipment You'll Need
- Waffle Iron: A standard Belgian waffle maker works wonderfully. Many home cooks swear by models like the Cuisinart 4-slice Belgian waffle maker for consistent results.
- Mixing Bowls: One medium bowl for whisking eggs, and small bowls for your prepped ingredients.
- Whisk: To thoroughly combine your eggs and seasonings.
- Spatula: Essential for spreading the egg mixture and carefully removing the cooked waffles.
The Simple Cooking Process
Once your ingredients are prepped and your equipment is ready, the magic begins:
- Preheat Your Waffle Iron: Plug in your waffle maker and set it to a medium heat setting. Allow it to fully preheat according to the manufacturer's instructions. This ensures even cooking and a golden-brown finish.
- Prepare the Egg Mixture: In a medium bowl, whisk together the 8 eggs with sea salt and freshly ground black pepper until well combined and slightly frothy. Set aside.
- Grease the Iron: Lightly grease the surface of your hot waffle iron with butter or avocado oil. Even non-stick surfaces benefit from a thin layer of fat to prevent sticking and encourage browning.
- Layer Your Ingredients: Over the greased surface of each waffle section (if using a multi-slice maker), sprinkle a small amount of the diced green onions, red bell pepper, and ham. This ensures the savory ingredients are embedded throughout the omelet.
- Pour and Top: Carefully pour about ¼ of the whisked egg mixture over the ingredients in each section. Use a spatula to gently nudge the egg into the corners and ensure even coverage, but be mindful not to overfill. It’s always better to make a slightly smaller waffle than to have egg overflow. Immediately sprinkle ¼ of the grated cheddar cheese over the top of the egg mixture.
- Cook to Perfection: Gently close the lid of your waffle iron. Cook for approximately 3 minutes, or until the egg mixture is thoroughly done, golden brown, and cooked through. Cooking times can vary slightly based on your waffle iron and desired crispness.
- Repeat and Serve: Open the lid, carefully remove your perfectly cooked omelet waffle with a spatula. Repeat the greasing, layering, pouring, and cooking process for the remaining omelet waffles. You can serve them immediately or keep them warm in a low oven (around 200°F/90°C) while you finish cooking the batch.
Tips, Tricks, and Customizations for Your Waffle Omelets
While the classic Western combination is a perennial favorite, the beauty of waffle omelets lies in their adaptability. Here are some insights to help you master your new favorite breakfast and make it uniquely yours.
Mastering Your Waffle Iron
- Don't Skimp on Greasing: Even if your waffle iron boasts a non-stick coating, a little butter or oil goes a long way in ensuring your omelet waffles release cleanly and achieve that desirable crispy exterior.
- Mind the Fill Line: Overfilling is the most common mistake. Start with a slightly conservative amount of egg mixture – you can always add more on subsequent waffles if your iron has extra capacity.
- Heat Settings Matter: A medium-to-medium-high setting usually works best. Too low, and your eggs might steam rather than crisp; too high, and they could burn before cooking through.
Flavor Variations & Dietary Adjustments
Feel free to experiment beyond the Western profile!
- Veggie Power: Add finely chopped spinach, mushrooms, sun-dried tomatoes, or kale. Just be sure to sauté watery vegetables like mushrooms or spinach beforehand to remove excess moisture.
- Meat Lovers: Swap ham for cooked crumbled sausage, bacon bits, or even diced turkey.
- Cheese Please: Monterey Jack, mozzarella, feta, or a Mexican blend can add different flavor notes.
- Spice It Up: A dash of hot sauce in the egg mixture or served on top can provide a welcome kick. Salsa or a dollop of sour cream also make excellent additions.
- Naturally Gluten-Free & Low-Carb: Since these waffle omelets primarily consist of eggs, cheese, and vegetables, they are inherently suitable for gluten-free and lower-carb diets. For more detailed guidance, consider exploring our Protein-Packed Western Omelet Waffles: A Gluten-Free Recipe Guide.
Storage and Reheating
One of the best features of western omelet waffles is how well they store and reheat. If you have leftovers, simply:
- Store them in an airtight container in the refrigerator for up to 3-4 days.
- Reheat them in a toaster or toaster oven for a few minutes until warmed through and slightly crisp again. The microwave can also work, but won't give you the same texture. You can even pop them back into the waffle iron for a quick refresh!
Creative Serving Suggestions
While sliced avocado and extra green onions are fantastic, don't stop there!
- Serve with a side of savory rosemary breakfast potatoes, a fresh fruit salad, or a dollop of Greek yogurt.
- Drizzle with a touch of maple syrup for a surprising sweet and savory combination.
- Turn them into breakfast sandwiches by placing them between two pieces of toast or a toasted English muffin.
Conclusion
The innovation of western omelet waffles truly transforms the breakfast experience, making a gourmet-quality meal accessible and stress-free for any home cook. By simply utilizing your waffle iron, you can bid farewell to the frustrations of traditional omelet making and embrace a cleaner, easier, and just as delicious alternative. Packed with protein and bursting with the familiar flavors of ham, peppers, onions, and cheese, these crispy, fluffy egg waffles are not just a meal; they're a revelation.
So, dust off that waffle maker, gather your ingredients, and prepare to embark on a culinary journey that promises delightful mornings and satisfied appetites. Whether you're a seasoned chef or a breakfast novice, the waffle omelet is your ticket to a fantastic, mess-free Western breakfast experience. Give it a try – your taste buds (and your clean kitchen) will thank you!
